
Bringing up the infrastructure
Let’s build a basic synth with AudioKit – Part 1: Overview & Introduction
Audio synthesis is a really complex topic. It blends mathematics with abstract concepts like “modularity” and “reusability”. One of the things I love more about AudioKit is the fact that is well optimized for OOP and “modularity”, so you are so close to the “real thing”, also if behind a screen.
Even if we could go quick and dirty by setting up easily a playground, I’d like to build a full project from start to end. In this first part we will start thinking about the infrastructure, next we will create the project and “port” our infrastructure and transform it into full working code. Finally, we will add custom controls with PaintCode, a very brilliant tool to make your own vectorial graphics with built-in custom swift/objective-c/android code.
The blocks
The scope of this tutorial series is not to enter into deep of mathematics involved into the whole process of audio synthesis, but rather to understand at a more high level what happens from when you press a key on a, let’s say, a keyboard, until the sound goes out from your speakers.
There are various kind of audio synthesis: subtractive, additive, FM, granular, wavetable based and many others. Furthermore, you can combine and blend them up, the sole limit is your creativity and obviously your calculator’s power when we talk of *virtual* synths, like the one we are about to build up. For simplicity purposes, we will analyze most simple one (at least at its basic usage): subtractive synthesis.
First block: Oscillator
Using subtractive synthesis, first block we will use an oscillator to generate our “raw” sound, using mathematical functions (under the hood) that produces sound “oscillating” from a value to another value over and over again in the time domain, with a frequency depending on what key we are pressing. When we trigger a key, the oscillator starts oscillating; when we release that key, the oscillator stops oscillating.
Second block: Filter
Next, we pass the generated sound to our second block: filter block. Now, it’s really at this point that we act as “subtractors”: we pass to the filter our “whole” signal, next we subtract frequencies from it. This is done usually with a low/high frequency pass, shelf, notch, and others type of frequency manipulations. Sometimes we can use filter to *add* frequencies to our original signal, but in this example we will rather subtract instead of adding stuff.
Third block: Output Signal ADSR Envelope
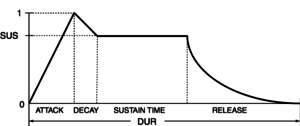
Finally, our simple 3-block scheme considers an ADSR Envelope, that shapes the sound during the time we press a key on the keyboard.
- A = Attack, measured in the time domain (usually milliseconds), specifies after how much time we reach the decay phase
- D = Decay, measured in the time domain (usually milliseconds), specifies after how much time we stabilize ourselves into sustain phase
- S = Sustain, measured in normalized values, like from 0 to 1, specifies the amplitude that the sound will maintain when it comes from decay phase and until key will be released.
- R = Release, measured in the dime domain (usually milliseconds), specifies after how much time amplitude will reduce to 0 and thus no sound will be heard, from the moment we release the key
You can imagine it like a graph, where on the X axis we have time and on the Y axis we have amplitude

Conclusions
Well, this first part of our tutorial is completed. We should now have a basic idea of how a sound is generated when we press a key on the keyboard, then what happens during the key press, and what finally happens when we release the key. In the next episode, we will set up our iOS project on Xcode and start getting our hands dirty with coding.
Cheers,
Mike


[…] (If you missed Part I, please read that section first). […]