Let’s build a basic synth with AudioKit –
Part 2: Project creation
(If you missed Part I, please read that section first).
In the previous episode, we inspected from a macroscopic perspective, what’s under the hood in a virtual synth. Now we are ready to apply these concepts and port them into a fully working project. Let’s start.
Create the XCode iOS Project
We are assuming that you have properly installed AudioKit, if not please download/install it by following the official guidelines.
First thing first, let’s open XCode and create a new Single View iOS Project
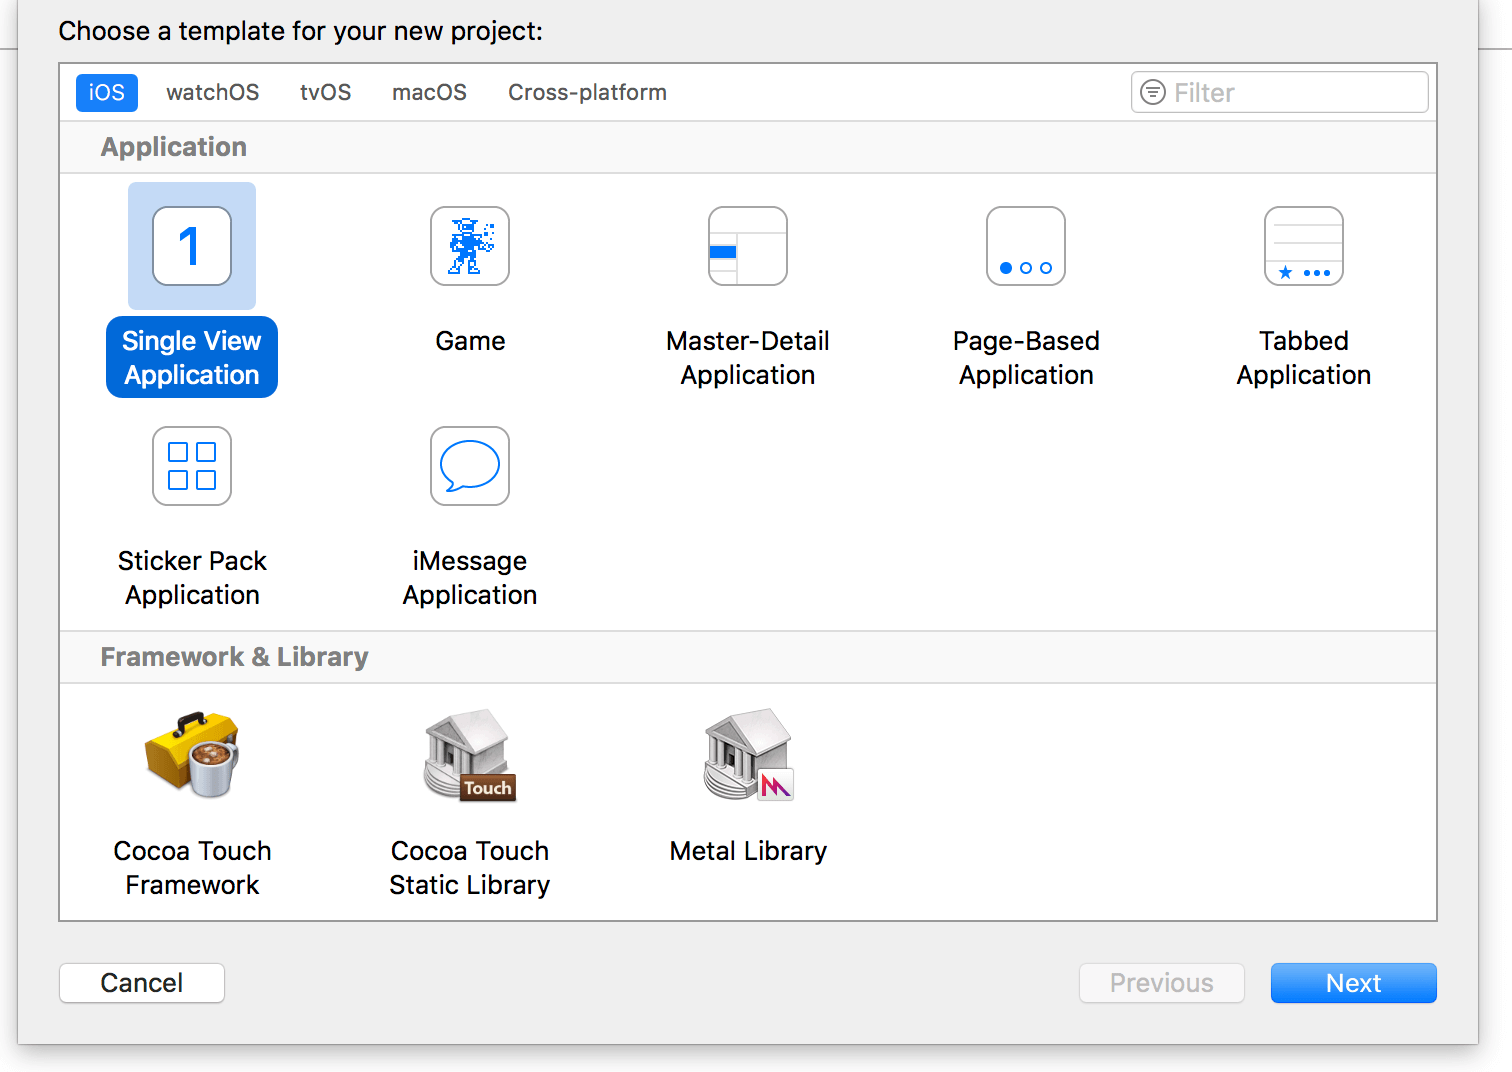
Next, select default settings, select your company organization and the other stuff, press Next, in the next popup window select the directory where to save the project, eventually press Ok to finish the setup process.
Now, you should include your AudioKit framework to your project, you can do this i.e. by using CocoaPods, or manually embedding the framework, please read the official guidelines, as above.
If you’ve done anything correctly, pressing ⌘B should lead to a successfully project building, without errors. Otherwise, repeat installation/embedding instructions.
Now, we are ready to get our hands dirty with the code. Open your ViewController.swift file. We will do all our work into this ViewController, also we will not use Storyboard, but instead we will create our GUI properties programmatically, in order to speed up things. Code is self-commented so it should not be tricky to understand even if you have minimum iOS programming and Swift knowledge.
Create the Oscillator
First, we will create an Oscillator to generate the sound. AudioKit gives us many type of Oscillators, for simplicity purposes we will generate an Oscillator that will produce a simple Sawtooth waveform (due the fact that Sawtooth waveform has a big amount of harmonics, that we will subtract after with our filter, in order to get a more audible result).
For this purpose, we will use AKOscillator class. There are other types of Oscillators, but for now we will go straight with this (simple) one; in the next series we will learn to use other Oscillator types and even to write down our own Oscillators. Let’s create the variable, we will call the class’ init() method later.
|
1 2 |
// Create our Oscillator var oscillator: AKOscillator! |
Create the Filter
Next block is our Filter section. We will use a simple Lowpass Filter, in this case AKLowPassFilter class will be our friend.
A lowpass filter (at its basic implementation) has two parameters:
- Cutoff Frequency -> is the frequency beyond which the filter will start to subtract frequencies
- Resonance (or Q factor) -> is a dimensionless parameters that in this case represents the amount of resonance of the filter in its cutoff frequency
For simplicity purposes, when we will modify the “filter” value using our GUI Slider, we will automatically set the Resonance value according to Cufott Frequency value.
|
1 2 |
// Create a Lowpass Filter var filter: AKLowPassFilter! |
Create the ADSR Envelope
Last but not least, we’re going to create our third and final block, for this basic project: the ADSR Envelope. We will use the AKAmplitudeEnvelope class, that provides us with Attack, Decay, Sustain and Release settings.
|
1 2 |
// Create an ADSR Envelope var envelope: AKAmplitudeEnvelope! |
Override viewDidLoad() method
In order to make things clean, we will split our work into two macro functions: and setupAudio() and setupUI()
|
1 2 3 4 5 |
override func viewDidLoad() { super.viewDidLoad() setupAudio() setupUI() } |
Create private function setupAudio()
|
1 2 3 4 5 6 7 8 9 10 11 12 13 14 15 16 17 |
// Setup Audio Layer private func setupAudio() { // Setup the Oscillator with a Sawtooth Waveform Table self.oscillator = AKOscillator(waveform: AKTable(.sawtooth)) // Setup the Lowpass Filter with an initial Cutoff of 22000, almost no filtering self.filter = AKLowPassFilter(oscillator, cutoffFrequency: 22000.0, resonance: 0.2) // Setup the ADSR Envelope and apply it to our Lowpass filter output self.envelope = AKAmplitudeEnvelope(self.filter, attackDuration: 0.01, decayDuration: 0.1, sustainLevel: 1.0, releaseDuration: 0.1) // Setting AudioKit's output with our ADSR Envelope (our third and last block) AudioKit.output = self.envelope // Start AudioKit Engine AudioKit.start() } |
We will first instantiate our AKOscillator property with a sawtooth AKTable (waveform). This is our “Oscillator node”.
Next, we will setup our AKLowPassFilter. We pass into its constructor 3 parameters: an AKNode (all generators/effects nodes inherit from AKNode) that is our oscillator and its initial values for Cutoff Frequency and Resonance. Human beings are capable of perceiving frequencies up to ~22 kHz (in the reality, if a 40 yo. man can perceive a 16 kHz frequency he could say he’s lucky!), so applying a Cutoff Frequency of 22kHz would mean “Do not subtract nothing audible”, and for a sampling rate of 44100 kHz it would preserve almost the entire frequency spectrum (as stated by Shannon-Nyquist sampling theorem).
Eventually, we will instantiate our ADSR Envelope, accepting as input node our filter and settings its initial values: 0.01 ms for the Attack, 0.1 ms for the Decay, 1.0 as Sustain value and 0.1 ms as Release.
Now it’s time to tell AudioKit which node will be used as its output.
So, our chain acts as following:
OSCILLATOR -> flows into FILTER -> flows into ADSR ENVELOPE
So we will ask AudioKit to set our ENVELOPE node as its output.
If we would route our audio signal *before* entering into envelope stage, we could ask AudioKit to set our FILTER node as its output, in example.
Next, last thing to do is to start our engine, via AudioKit.start() method.
Create private function setupUI()
|
1 2 3 4 5 6 7 8 9 10 11 12 13 14 15 16 17 18 19 20 21 22 23 24 25 26 27 28 29 30 31 32 33 34 35 36 37 38 39 40 41 42 43 44 45 46 47 48 49 50 51 52 53 54 55 56 57 58 59 60 61 62 63 64 65 66 67 68 69 70 71 72 73 74 75 76 77 78 79 80 81 82 83 84 85 86 87 88 89 90 91 92 93 94 95 96 97 98 99 100 101 |
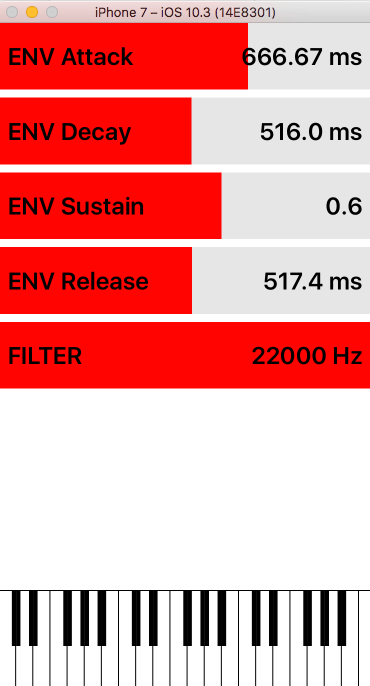
// Setup Graphic User Interface private func setupUI() { // Create AKKeyboardView and, set some constraints to it and setting self as delegate let keyboard = AKKeyboardView(width: 0, height: 0, firstOctave: 3, octaveCount: 3) keyboard.translatesAutoresizingMaskIntoConstraints = false self.view.addSubview(keyboard) let yPosConstraint = NSLayoutConstraint(item: keyboard, attribute: .centerY, relatedBy: .equal, toItem: self.view, attribute: .centerY, multiplier: 1.85, constant: 0) let heightConstraint = NSLayoutConstraint(item: keyboard, attribute: .height, relatedBy: .equal, toItem: self.view, attribute: .height, multiplier: 0.15, constant: 0) let widthConstraint = NSLayoutConstraint(item: keyboard, attribute: .width, relatedBy: .equal, toItem: self.view, attribute: .width, multiplier: 1.0, constant: 0) keyboard.delegate = self // Set Attack, Decay, Sustain and Release sliders and set their constraints // Attack let attackSlider = AKPropertySlider( property: "ENV Attack", format: "%0.2f ms", value: self.envelope.attackDuration, minimum: 0.01, maximum: 1000.0 ) { attackValue in self.envelope.attackDuration = attackValue / 1000 } attackSlider.translatesAutoresizingMaskIntoConstraints = false self.view.addSubview(attackSlider) let atkWidthConstraint = NSLayoutConstraint(item: attackSlider, attribute: .width, relatedBy: .equal, toItem: self.view, attribute: .width, multiplier: 1.0, constant: 0) let atkHeightContraint = NSLayoutConstraint(item: attackSlider, attribute: .height, relatedBy: .equal, toItem: self.view, attribute: .height, multiplier: 0.1, constant: 0) // Decay let decaySlider = AKPropertySlider( property: "ENV Decay", format: "%0.1f ms", value: self.envelope.decayDuration, minimum: 0.1, maximum: 1000.0 ) { decayValue in self.envelope.decayDuration = decayValue / 1000 } decaySlider.translatesAutoresizingMaskIntoConstraints = false self.view.addSubview(decaySlider) let dcyWidthConstraint = NSLayoutConstraint(item: decaySlider, attribute: .width, relatedBy: .equal, toItem: self.view, attribute: .width, multiplier: 1.0, constant: 0) let dcyHeightContraint = NSLayoutConstraint(item: decaySlider, attribute: .height, relatedBy: .equal, toItem: self.view, attribute: .height, multiplier: 0.1, constant: 0) let dcyUpperContraint = NSLayoutConstraint(item: decaySlider, attribute: .top, relatedBy: .equal, toItem: attackSlider, attribute: .bottom, multiplier: 1.0, constant: 8) // Sustain let sustainSlider = AKPropertySlider( property: "ENV Sustain", format: "%0.1f", value: self.envelope.sustainLevel, minimum: 0.0, maximum: 1.0 ) { sustainLevel in self.envelope.sustainLevel = sustainLevel } sustainSlider.translatesAutoresizingMaskIntoConstraints = false self.view.addSubview(sustainSlider) let stnWidthConstraint = NSLayoutConstraint(item: sustainSlider, attribute: .width, relatedBy: .equal, toItem: self.view, attribute: .width, multiplier: 1.0, constant: 0) let stnHeightContraint = NSLayoutConstraint(item: sustainSlider, attribute: .height, relatedBy: .equal, toItem: self.view, attribute: .height, multiplier: 0.1, constant: 0) let stnUpperContraint = NSLayoutConstraint(item: sustainSlider, attribute: .top, relatedBy: .equal, toItem: decaySlider, attribute: .bottom, multiplier: 1.0, constant: 8) // Release let releaseSlider = AKPropertySlider( property: "ENV Release", format: "%0.1f ms", value: self.envelope.releaseDuration, minimum: 0.1, maximum: 1000.0 ) { releaseDuration in self.envelope.releaseDuration = releaseDuration / 1000 } releaseSlider.translatesAutoresizingMaskIntoConstraints = false self.view.addSubview(releaseSlider) let rlsWidthConstraint = NSLayoutConstraint(item: releaseSlider, attribute: .width, relatedBy: .equal, toItem: self.view, attribute: .width, multiplier: 1.0, constant: 0) let rlsHeightContraint = NSLayoutConstraint(item: releaseSlider, attribute: .height, relatedBy: .equal, toItem: self.view, attribute: .height, multiplier: 0.1, constant: 0) let rlsUpperContraint = NSLayoutConstraint(item: releaseSlider, attribute: .top, relatedBy: .equal, toItem: sustainSlider, attribute: .bottom, multiplier: 1.0, constant: 8) // Filter Cutoff and Resonance let filterSlider = AKPropertySlider( property: "FILTER", format: "%0.f Hz", value: self.filter.cutoffFrequency, minimum: 1.0, maximum: 22050.0 ) { filterVariation in self.filter.cutoffFrequency = filterVariation self.filter.resonance = 1.0 - (filterVariation / 22050.0) } filterSlider.translatesAutoresizingMaskIntoConstraints = false self.view.addSubview(filterSlider) let fltWidthConstraint = NSLayoutConstraint(item: filterSlider, attribute: .width, relatedBy: .equal, toItem: self.view, attribute: .width, multiplier: 1.0, constant: 0) let fltHeightContraint = NSLayoutConstraint(item: filterSlider, attribute: .height, relatedBy: .equal, toItem: self.view, attribute: .height, multiplier: 0.1, constant: 0) let fltUpperContraint = NSLayoutConstraint(item: filterSlider, attribute: .top, relatedBy: .equal, toItem: releaseSlider, attribute: .bottom, multiplier: 1.0, constant: 8) // Activate the constraints NSLayoutConstraint.activate([yPosConstraint, heightConstraint, widthConstraint, atkWidthConstraint, atkHeightContraint, dcyWidthConstraint, dcyHeightContraint, dcyUpperContraint, stnWidthConstraint, stnHeightContraint, stnUpperContraint, rlsWidthConstraint, rlsHeightContraint, rlsUpperContraint, fltWidthConstraint, fltHeightContraint, fltUpperContraint]) } |
In the next and final part we will create our custom controls with Paintcode, meanwhile we will use default sliders and keyboard that AudioKit provides us.
I assume that you are familiar with concepts like “Delegate methods” and “Closures”, if not this is time for you to get back into iOS/Swift programming.
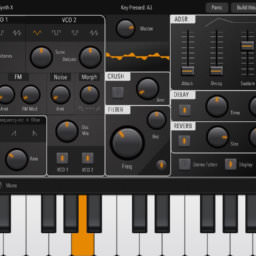
We will use AudioKit’s AKKeyboardView. It provides us with a standard keyboard, we can select numbers of octave, also. For our basic implementation, this sounds pretty good.
Next, we apply some constraints in order to take advantage of XCode’s AutoLayout and placing the keyboard at the bottom of the iDevice’s screen.
We will user AKKeyboardDelegate in order to get notified when a key is pressed or released. These methods will be triggered, so we use extensions to extend our ViewController with AKKeyboardDelegate functionalities (aka: functions). We could implement them directly in our ViewController class and implement the interface during class signature/declaration, but I’d rather prefer using extensions, I think it’s a more elegant pattern to follow. But this is totally up to you.
Ok, now meet AKPropertySlider. This “straight-out-of-the-box” class gives us a nice way to hook a AKNode’s property and set its value. It’s a horizontal slider, let’s analyze its properties:
- property -> is the name we want to assign to the property
- format: -> is the format style we want to do to the visualized value. “%0.2f ms” in example means we want use 2 decimal cyphers and we will add “ms” after the value
- value: -> is the property we want to hook. So the initial value of the slider will reflect the initial value of the property
- closure -> every time we change the slider’s value, a closure will be triggered, capturing a value (its type will be equal to property value type) and permitting us to “do things” with that value. This is right time to set up our property’s value, and/or other properties’ values that depends from this slider
After declaring one slider for our ADSR Envelope’s Attack, Decay, Sustain, Release and for our Filter’s Cutoff Frequency, we will setup their constraints, as well as we did for the keyboard.
We will activate our constraints and we are done.
Listening events triggered from the Keyboard
|
1 2 3 4 5 6 7 8 9 10 11 12 13 14 15 16 17 18 19 |
// AKKeyboardDelegate methods extension ViewController: AKKeyboardDelegate { func noteOn(note: MIDINoteNumber) { self.oscillator.frequency = note.midiNoteToFrequency() self.envelope.start() self.oscillator.play() } func noteOff(note: MIDINoteNumber) { let mainQueue = DispatchQueue.main let deadline = DispatchTime.now() + .milliseconds(Int(self.envelope.releaseDuration * 1000)) mainQueue.asyncAfter(deadline: deadline) { self.oscillator.stop() self.envelope.stop() } } } |
The AKKeyboardDelegate gives us 2 functions:
noteOn(note:) and noteOff(note:)
In both functions, the “note” parameter tells us *which* note is pressed/released. In our case, we are building a monophonic synth, so this not really matters. But in the case of a polyphonic synth, you will know which note has been triggered or released.
When a note is triggered, we will grab its midi-to-frequency value (AKKeyboardView will trigger “midi-like” notes like 62, 75 etc.), next we will tell our oscillator to set up oscillating frequency according to this value. At last, we start both our envelope and the oscillator. Starting only the oscillator would produce no sound, due the fact that its amplitude will be constantly 0. Oscillators have a parameter, amplitude itself, that in our case is automatically hooked to our ADSR envelope, when we specifies that our oscillator should be used as input AKNode for our ADSR Envelope. To say it in a nut, we control our Oscillator’s amplitude via our ADSR Envelope.
When the key is released, we may be tempted to stop our Oscillator. And this will effectively stop the sound, but this would prevent our release duration from being respected, due the fact AKOscillator is a very basic oscillator and it does not provides us with its own ADSR values, like instead other oscillator types do, like AKOscillatorBank in example.
So we will use a little trick, dispatching oscillator.stop() when our release duration will be reached. It’s not 100% precise, but for this tutorial’s purpose it’s okay. After this happens, we can safely stop our oscillator *AND* our ADSR Envelope (if we don’t stop also the Envelope, its next start() wouldn’t work properly).
Build the project and test it
Full project is available here
Don’t forget to add your AudioKit framework to the project.
You can build the project and run it without get any problem. Just play notes on the keyboard and feel free to play around with the sliders
In the next episode, we will create our custom controls in Paintcode.
Cheers,
Mike
To be continued in Part III…
Hi Mike,
Thanks for posting “My Synth”! I am having the same issue as this guy:
https://github.com/mikegazzaruso/MySynth/issues/1
Has this been resolved? What’s the fix?
Thanks Mike!
Bosko
ElectroSpit.com
Hi Bosko,
thanks for your feedback.
I’ve fixed the issue, caused by a porting to the actual AudioKit/AudioKitUI frameworks.
You can sync your repo with my last commit, you can check it in my answer to the guy’s issue
https://github.com/mikegazzaruso/MySynth/issues/1
Thanks and Cheers
Mike I’m having trouble finding the AKKeyboardView class. Where do I find it in AudioKit Documentation?