This tutorial will walk you through creating an iOS visualizer in XCode using AudioKit and SwiftUI. In this tutorial, we will use the built-in microphone from the iPhone or iPad as the input to the visualizer. All of the code for this application can be found at the following github repository:
https://github.com/Matt54/SwiftUI-AudioKit-Visualize
Get the latest Version of AudioKit
First, we need to download the framework for AudioKit. Go to the following URL and download the latest iOS version:
https://audiokit.io/downloads/
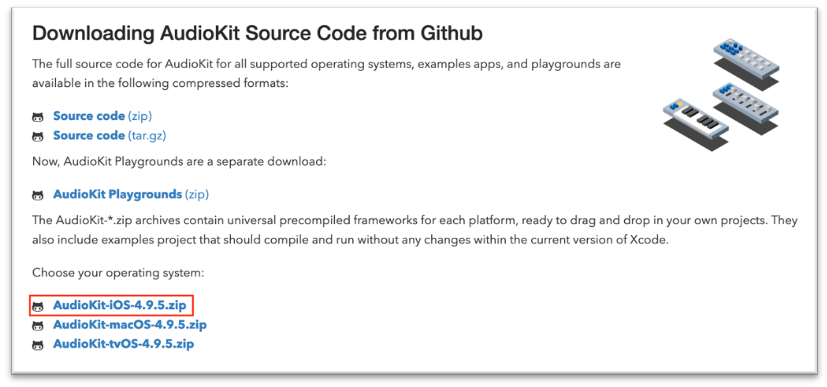
Next, unzip the package and place the files somewhere convenient on your computer.
You will not want to alter the path to this directory as it will break your project, so it is worth placing it somewhere that is more or less permanent. I prefer creating a development directory on my computer where I store libraries and frameworks for this reason.
Create a new project
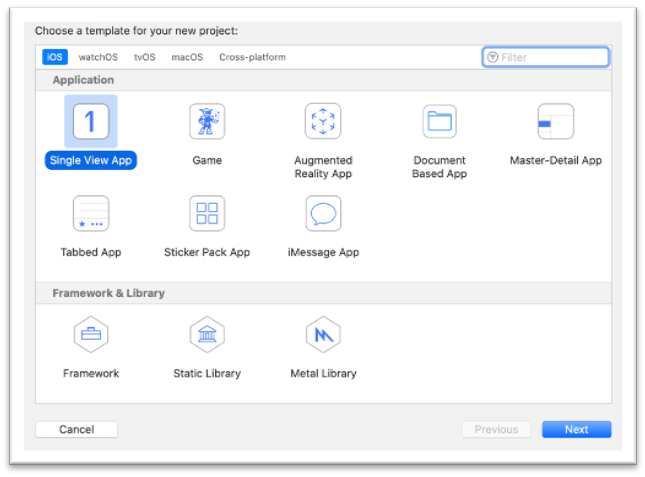
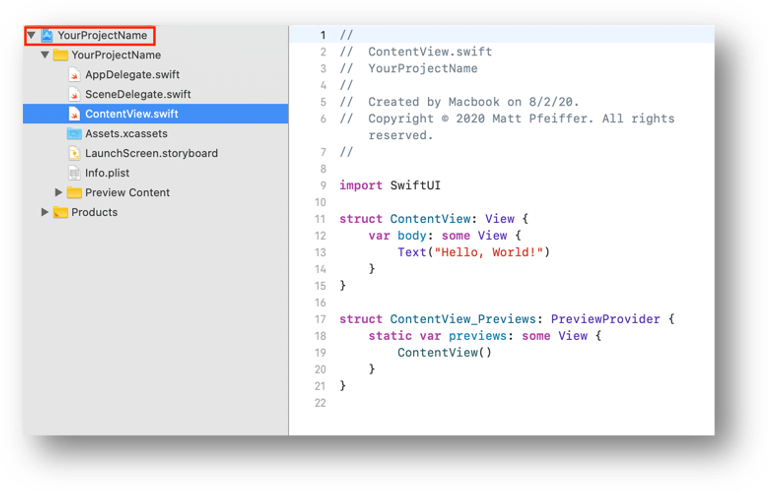
Now, let’s create a new project. Choose Single View App and press Next:
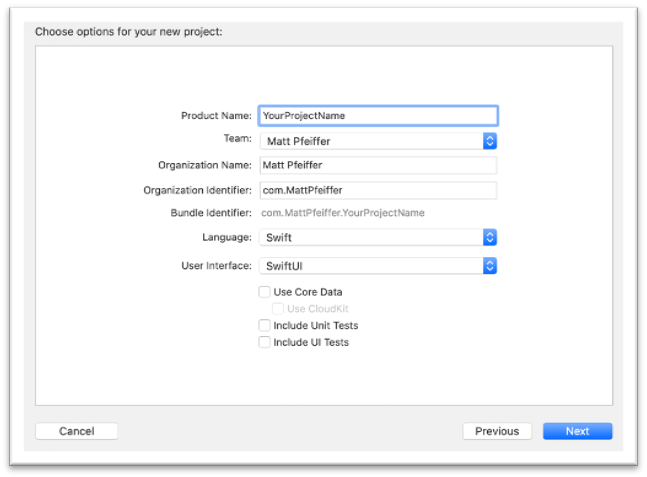
Name the project and choose Swift for language and SwiftUI for the User Interface:
Add AudioKit Framework
Double click on your project in the Project Navigator:
In the General tab, scroll down to Frameworks, Libraries, and Embedded Content and click the plus (“+”) icon:

Click on the “Add Other…” dropdown and click “Add Files…”

Browse to the AudioKit framework downloaded earlier and click Open:

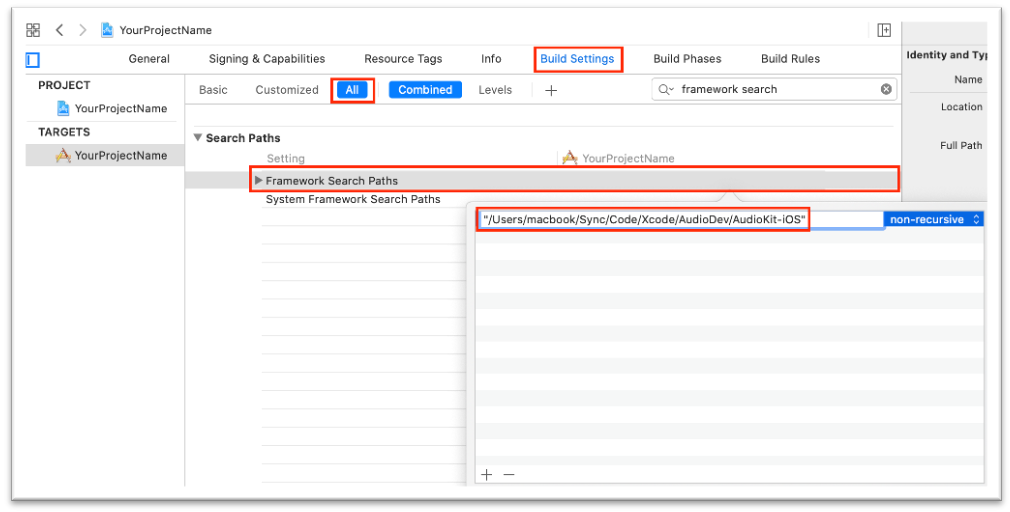
Click on the “Build Settings” Tab , make sure “All” is selected and search for “framework search”. You should find “Framework Search Paths” in the “Search Paths” settings. Add the search path to the parent directory of your AudioKit framework. It should look like this:
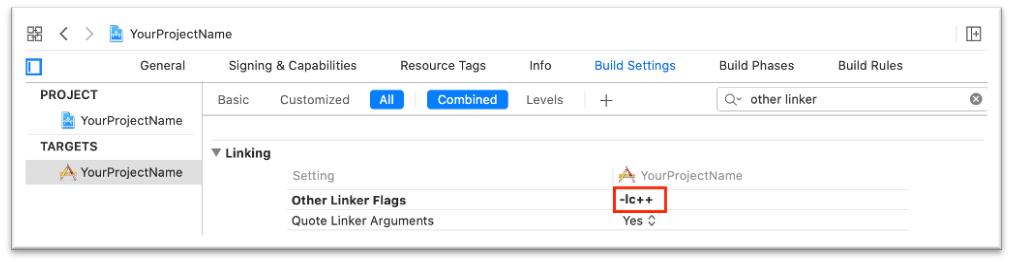
Search for “other linker” and in the “Linking” settings for “Other Linker Flags” add “-lc++”
Conductor.swift
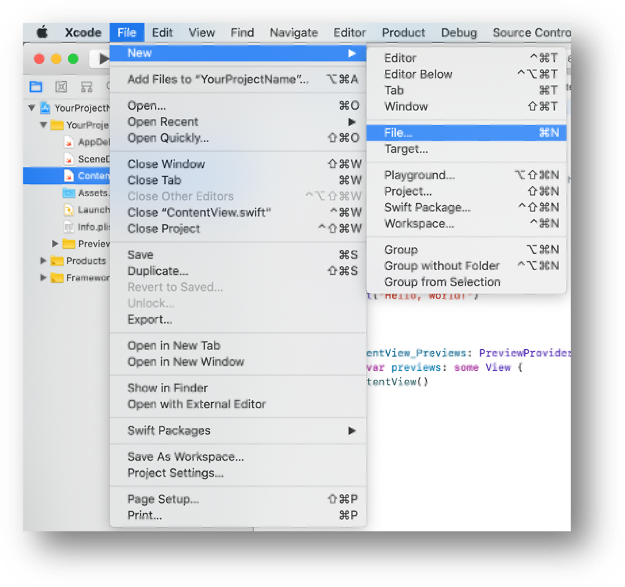
Now, let’s create a new file in our project folder called Conductor.swift. Go to File -> New -> File…:
Select Swift File and Click Next:
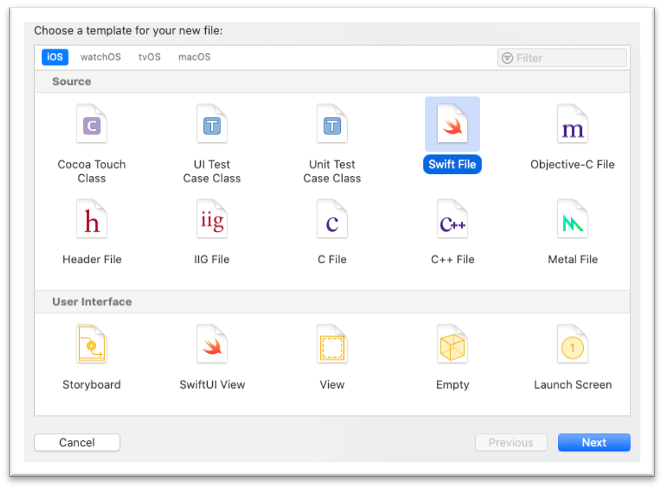
Name the file Conductor.swift and click Create.
The “Conductor” class we will create in this file will be our persistent data object. In other words, this object will stay in memory through the life of the application. Within this object, we will do all of our audio processing.
The code for the Conductor class can be found at the following link:
https://github.com/Matt54/SwiftUI-AudioKit-Visualizer/blob/master/Visualizer/Models/Conductor.swift
I have documented the code in an attempt to make it easy to understand at a glance. I tried to name all variables in a way that self explains what they are as well as add comments to aid in your understanding. However, if you don’t have much domain knowledge in the audio realm, you will probably have a hard time understanding what an FFT (fast fourier transform) is. In this case, I suggest that you look into this algorithm, because it is the heart of this application. I have provided a few useful links in the code at the bottom of the file.
Here is a short explanation of Conductor.swift:
The Conductor:
- Sets up the audio routing for our application
- Holds an array of amplitude values from the last refresh
- Updates the amplitude values due to a timer callback occurring at a rate specified by the refresh time interval
- Publishes amplitude array value changes to the binded SwiftUI views
SceneDelegate.swift
Now once you have created and saved Conductor.swift, find the following line of code in SceneDelegate.swift:
![]()
Adjust that line to the following:
![]()
This will connect our data model to our view.
VerticalBar.swift
We will create a view for a single vertical bar and then make a view which has many of them.
Create a new file in the project folder like before, however select the SwiftUI option:
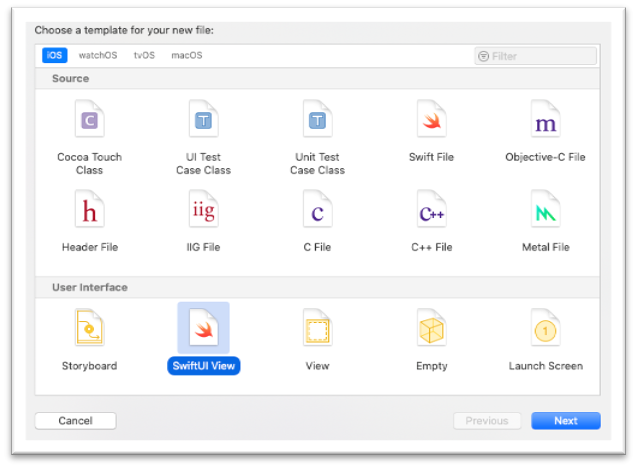
Name the file VerticalBar
The code for the Vertical bar view can be found at the following link:
https://github.com/Matt54/SwiftUI-AudioKit-Visualizer/blob/master/Visualizer/Views/VerticalBar.swift
Again, here is a short explanation as I will let the code self-explain to an extent:
The VerticalBar View:
- Is databound to an amplitude variable (this causes automatic updating to the view as the variable changes).
- Has a GeometryReader which allows us to know how big the view is being shown. With this approach, we can avoid hard-coding any pixel values for our width or height.
- Consists of a ZStack (overlayed views) with three rectangles.
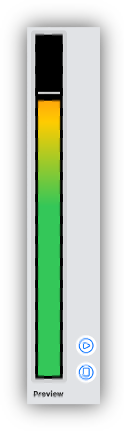
- Rectangle #1 sits at the back and is a gradient of the colors green, yellow, and red. The fade from green into yellow and red does not start until the middle of the rectangle.
- Rectangle #2 is black and is in front of Rectangle #1. Rectangle #2’s gets padded from the bottom by an amount set by the amplitude. This let’s some percentage of Rectangle #1 be seen (0 to 100%) based on the current value of the amplitude (0 to 1.0).
- Rectangle #3 is our floating white bar that is always offset to be above where the cutoff is from Rectangle #2 blocking Rectangle #1.
- Changes in Rectangle #2 and Rectangle #3 are animated to smooth them out. Rectangle #3 has a longer animation duration, which creates the floating effect on amplitude change.
If your code is correct, you should see this bar in the canvas preview:
AmplitudeVisualizer.swift
Create another SwiftUI file in your project folder and name it AmplitudeVisualizer.
The code for the Vertical bar view can be found at the following link:
This view is quite simple, here is a short explanation:
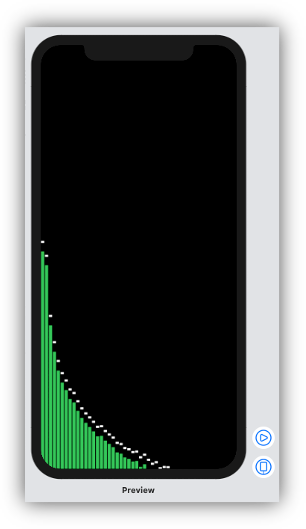
The AmplitudeVisualizer View:
- Is databound to an array of amplitude values.
- Is an HStack (horizontal arrangement of views) with as many VerticalBar views as the number of values in the amplitudes array
- Has a black background
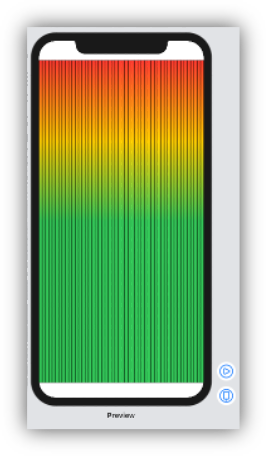
If your code is correct, you should see these bars in the canvas preview:
ContentView.swift
Short Explanation of changes to ContentView.swift (the main view of the application):
- Add the AmplitudeVisualizer view to the ContentView.
- Ignore safe area to cover full screen.
- Add our Conductor object as an environment object in the ContentView.
- Bind the amplitude array of our conductor object to the amplitude visualizer view.
The code for the ContentView can be found at the following link:
https://github.com/Matt54/SwiftUI-AudioKit-Visualizer/blob/master/Visualizer/Views/ContentView.swift
If your code is correct, you may see something that resembles this in the canvas:
At this point we are done. Run the code and see if you get the audio visualization going. If it works, there’s plenty of ideas worth exploring from there. For example, try changing the colors or adding a visual effect like a blur or some kind of highlight that is associated with the lowest amplitude band (Conductor.amplitudes[0]).
Thanks for reading my tutorial!
If you enjoyed this, follow me on twitter: https://twitter.com/MattPfeiffer
Also, you can email me any questions.
– Matt Pfeiffer
Thank you for the excellent article!
I am following along step by step and encountering a couple of issues that I was hoping someone might be able to clarify.
Firstly, when I go to https://audiokit.io/downloads/ , the page is different in that the AudioKit-iOS, macOS and tvOS are gone and replaced with AudioKit XCFramework which is supposed to support all platforms so I have been using that. Testing by playing an oscillator tone seems to indicate that it is working.
When I add Conductor.swift, I get errors indicating that “Module ‘AudioKit’ has no member named ‘output’”. The error is resolved if I change the code from “AudioKit.output = outputLimiter” to “AKManager.output = outputLimiter”. The same is true of “try AudioKit.start”. I had to do the same thing in order to get the oscillator that I used to test that the framework was working to play.
With the above references changed to AKManager, and updating the line in SceneDelegate to “window.rootViewController = UIHostingController(rootView: contentView.environmentObject(Conductor.shared))”, I can build successfully.
However, I also have an error indicating that I “Cannot use optional chaining on non-optional value of type ‘AKMicrophone’” on “mic?.setOutput(to: micMixer)” in Conductor. If I follow the suggested fix of removing the “?”, I get the following crash when running on my device:
evp`@objc AKMicrophone.init():
0x104f5b500 : stp x29, x30, [sp, #-0x10]!
0x104f5b504 : mov x29, sp
0x104f5b508 : adr x0, #0xa2778 ; “AudioKit.AKMicrophone”
0x104f5b50c : nop
0x104f5b510 : adr x2, #0xa7a80 ; “init()”
0x104f5b514 : nop
0x104f5b518 : mov w1, #0x15
0x104f5b51c : mov w3, #0x6
0x104f5b520 : mov w4, #0x0
0x104f5b524 : bl 0x104fb7758 ; symbol stub for: _swift_stdlib_reportUnimplementedInitializer
-> 0x104f5b528 : brk #0x1
Any suggestions would be greatly appreciated!
Steven, Thank you for taking the time to pose this question. Did you get any responses yet? Did you try email to Matt Pfeiffer directly? I too want to use this visualization app using AudioKit – and am frustrated that Matt’s program doesn’t build. Thank you for pointing out two of the code lines that need changing.
Steven and Keith – I am sorry for just addressing this.
There have been changes made to the AudioKit framework since the tutorial was released that require adjusting how you setup the microphone.
I have rewritten the code to create this visualizer using AudioKit version 5 – the tutorial above uses version 4. Please, see the following github repository:
https://github.com/Matt54/AudioVisualizerAK5
I won’t list every change here between the projects as you can just download the project and run it / copy the boilerplate. However, some notable changes are that I have consolidated the two SwiftUI Views into a single View (FFTView) and I now use a callback from AudioKit’s FFTTAP in order to update the amplitude data for the view.
It’s also worth mentioning that with AudioKit V5, you can use the swift package manager to install AudioKit into your projects. See the “Installation via Swift Package Manager” section here:
https://github.com/AudioKit/AudioKit
This new installation project gets you up and running with new projects much faster. It allows you to avoid the “Add AudioKit Framework” steps above.
Sorry again for just now getting to this. Reach out if you have any more specific questions about this project.
This is really helpful … thanks for posting.